The ability to create multiple calendars in google drive is an amazing organisational tool, especially when you can hide/show and share them with a click. You could use separate calendars in a school for exam schedules, internal assessment deadlines, staff meetings, sporting events, your own lesson plans and SLT free/busy times and even for physical resources like netbook pods, science lab equipment or library time.
1) At GBHS and many 'apps' schools we automatically have our personal/primary calendar (which is your default entry and associated with the email address) and we have a 'GBHS Calendar' set up as well. Your own calendar is private, no-one else has access - but it is possible to share it with different
levels of visibility, and the 'GBHS Calendar' is shared so all staff can see it and have the ability to add/edit events. To create a new calendar of your choice navigate to the left of the screen and click the tiny triangle that points down - 'create new calendar' - Go on click it.....
levels of visibility, and the 'GBHS Calendar' is shared so all staff can see it and have the ability to add/edit events. To create a new calendar of your choice navigate to the left of the screen and click the tiny triangle that points down - 'create new calendar' - Go on click it.....

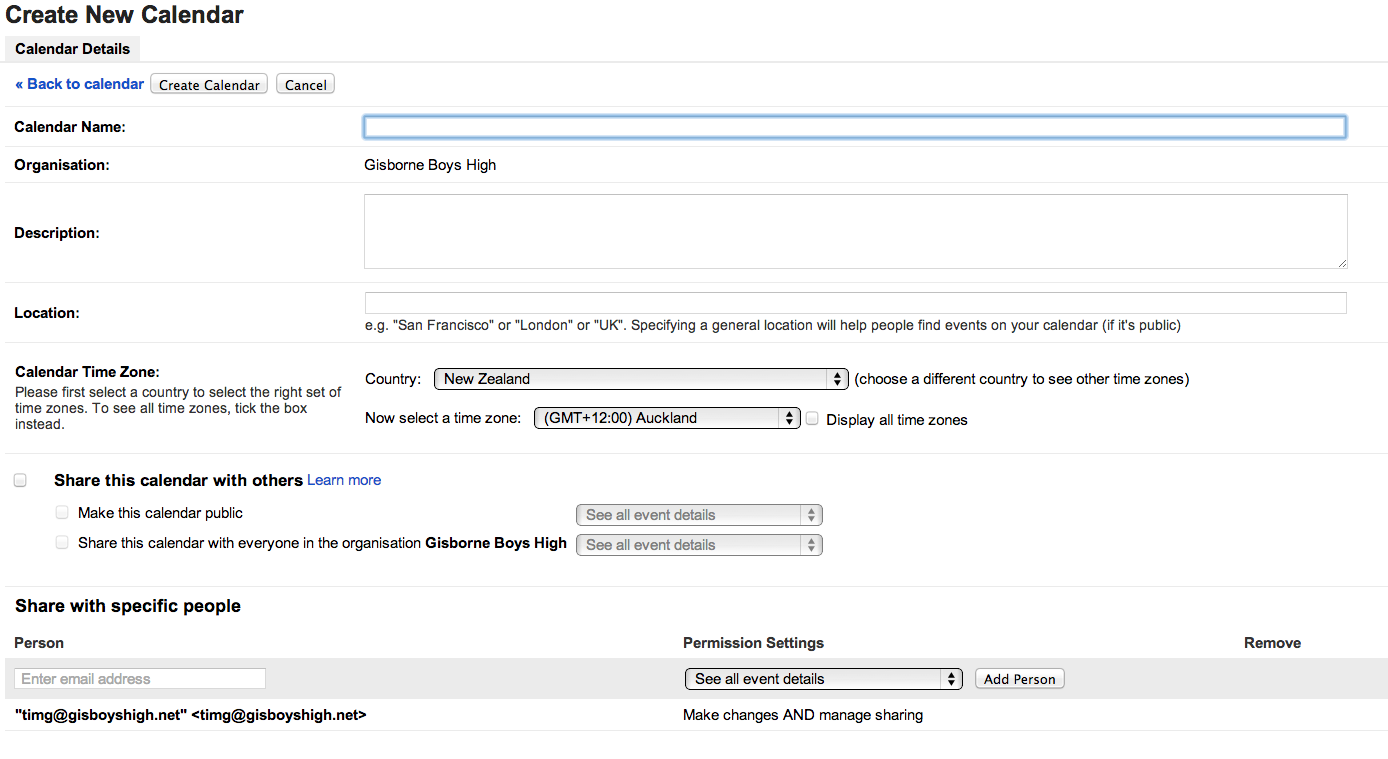
2) A new screen will pop up - most of the blank boxes are self explanatory, and are also easy to change if you decide you labeled your calendar incorrectly, so go ahead and fill in the blank spaces. Location and time zone aren't too important at this stage - the crucial part is 'share this calendar with others'
The first option is to set broad access to your calendar based on two buckets: the public (anyone in the world) and your domain (anyone who has a Google Apps account at your school-at GBHS it set so that only staff can see the shared calendar).
- If you would like to share your calendar very selectively by choosing individuals, leave this box unchecked.
- If you would like to give broad access to your calendar with the public or with members of your school that have Apps accounts, then check the box
Within these two options you can either allow people to 'see all event details' or only 'free/busy' times.
4) The next box allows you to share with specific people, maybe with other members of your department or class - you can allow others to add and edit events, at any time, by modifying your calendar sharing settings. For example, if there was a location change for a staff meeting another SLT member could update the information and depending on notification settings all people involved could receive a text message or email telling them that it had changed.
To invite people to collaborate on your new calendar you can start typing their first name in the box under 'person' and it should autofill. Decide what privileges you will grant them, the choices are;
- Make changes AND manage sharing-This person has owner rights to this calendar. You cannot grant someone outside your school Apps domain this level of access to your primary calendar. You can allow this, however, for secondary calendars such as a class, homework, school, holiday, or other group calendar.
- Make changes to events-This person can see and change all events, including private ones. You cannot grant someone outside your school Apps domain this level of access to your primary calendar. You can allow this, however, for secondary calendars such as a class, homework, school, holiday, or other group calendar.
- See all event details-This person can view the details of all events except those marked as private.
- See free/busy information (no details)-This person can see when your calendar is booked and when it has free time, but will not be able to see the names or details of any of your events.
To add them click 'add person', at any time if you want to stop them from having access you can change the settings, or delete them all together by pressing the 'bin' button next to their name. If you want all staff at the school to be able to view the calendar you need to add GBHS staff in the email address - and the privilege needs to be set to 'see all events'.
When you have finished adding people - click 'create calendar' and you are done! You can now start adding events to you calendar, but make sure you select the correct calendar when you are adding an event.
You can also invite people to collaborate/view individual events. I have been using google calendar to plan lessons, and invited a Policeman as a mentor into the lesson every tuesday so I invited him through google calendar, and allowed him to modify the lesson so he could add anything he thought would be useful after seeing the plan!
If you go back to the list of your calendars you can now tweak the sms/email notification settings by clicking on the little triangle by the specific calendar - but that's another post!!


Comments
Post a Comment